Showing posts with label Gardening Tips. Show all posts

Monday, May 27, 2013

Mulching your garden

Mulches are materials placed over the soil surface to maintain moisture and improve soil conditions. This goes for every garden site, from vegetable garden to flower bed Mulch can reduce water loss from the soil, minimize weed competition, and improve soil structure. Properly applied, mulch can give landscapes a well-groomed appearance. However, Mulch must be applied properly; if it is too deep or if the wrong material is used, it can actually cause significant harm to trees and other landscape plants.

Mulched gardens are healthier, more weed free, and more drought-resistant then unmulched gardens, so you'll spend less time watering, weeding, and fighting pest problems.

There are two basic kinds of mulch: organic and inorganic. Organic mulches include formerly living material such as chopped leaves, straw, grass clippings, compost, wood chips, shredded bark, sawdust, pine needles, and even paper. Inorganic mulches include gravel, stones, black plastic, and geotextiles (landscape fabrics).

Both types discourage weeds, but organic mulches also improve the soil as they decompose. Inorganic mulches don't break down and enrich the soil, but under certain circumstances they're the mulch of choice. For example, black plastic warms the soil and radiates heat during the night, keeping heat-loving vegetables such as eggplant and tomatoes cozy and vigorous.

Using Organic Mulches

There are two prime rules for using organic mulches to combat weeds. First, be sure to lay the mulch down on soil that is already weeded, and second, lay down a thick enough layer to discourage new weeds from coming up through it.

Wood chips and bark mulch: You can purchase bags of decorative wood chips or shredded bark from a local garden center to mulch your flower garden and shrub borders. Or simply from carpenters, they have loads.

Shredded leaves: If you have trees on your property, shredding the fallen leaves creates nutrient-rich mulch for free.You can spread a wood chip or shredded leaf mulch anywhere on your property, but it looks especially attractive in flower beds and shrub borders. Of course, it's right at home in a woodland or shade garden. They also serve well as a mulch for garden pathway.

Grass offcuts: Grass trimmings are readily available mulch, although it's a good idea to return at least some of your grass clippings directly to the lawn as a natural fertilizer. Its fine to collect grass clippings occasionally to use as mulch, and the nitrogen-rich clippings are an especially good choice for mulching vegetable gardens. Your vegetables will thank you for the nitrogen boost!

Straw and hay: Great mulch for the vegetable garden is straw or hays. It looks good and has most of the benefits of the other mulches: retaining soil moisture, keeping down weeds, and adding organic matter to the soil when it breaks down. But be sure the hay you use is weed and seed free.

Read more...

Sunday, May 26, 2013

How to create a new garden bed


1. Sketch the areas of your garden plot that you want to clear.

To get your edges straight for a square or rectangular vegetable plot, stretch a string between sticks and mark the line with a chalk stick.For a round shape, use a hose or rope to lay out the area, adjusting the position to create a smooth curve.

2.  Clear the surface by first removing dry plants, weeds, and rock.

If your garden area contains a lot of perennial weeds make sure that you first kill these weeds or grasses.

3.  Dig it up.

Now comes the digging. Dig up your new garden. If you have poor soil, now's also a great time to incorporate organic matter, such as compost. Just dig it in while you work the ground.

4. Create edging for the new bed

A waterway about 8 inches deep and a couple of inches wide will stop even the worst invaders from crossing and have a fine edging. Otherwise, drop an edging material around the border of your garden like bamboos.

5.  Position desired plants

Select which plants you will plant and place them before you put them in the ground can make a world of difference. This allows you to get the spacing just right and make your plants really will look good next to each other.

6.  start planting

When you know all of your plants are in exactly the right spots, plant them in the ground.

7.  Water them

Once your bed is planted and protected, give your plants a good soaking. Enjoy your gardening.

Tips: make sure you make research about the types of plant needed at the proper timing and place.

Read more...

Saturday, December 22, 2012

Spider plant - Chlorophytum comosum


Spider plants are botanically known as Chlorophytum comosum, and from studies done by NASA, they are good at purifying the air in your home and adds oxygen. Spider plants are easy to cultivate both indoors and outdoors. The Spider Plant is characterized by its long shoots of thin foliage, with off-shoots at the ends of many of the leaves. The Spider plant's leaves is commonly known to be variegated. It has green foliage with either a white or yellow central strip or along the outside edges or it can also have ones that are all green. It looks similar to thick, wild grass.


white or yellow central strip

Spider plants favor natural medium to high light, but no direct afternoon sunlight. The variegated spider plants need more light than the plain green ones. If the leaves begin turning brown, try moving the plant out of the direct light.

Spider plants are delicate to the chemicals in tap water (reasons for the brown tips). They should always be watered with purified water, rain water, or if you have an aquarium, it will thrive on that water. Once you have changed the water source, all the new leaves should be normal, but you will have to trim the brown tips off the old leaves. You can remove the brown ends by snipping them off with sharp scissors (Tip: Cut the ends in points so the leaves look more natural).

Rot is caused by over-watering. Spider plants should be allowed to dry out before being re-watered. If rot has begun, the plant may die. You can try to rescue the plant by removing it from its container and dividing it. Discard the rotten part and re-pot the healthy parts in a clean container with new soil.

Pests and mites are not a problem with this houseplant, however if it happens simply spray a soapy water mixture over the plants a couple of times a day.

The off shoots can be removed and placed in soil or water which will then grow into its own plant in very little time. It is actually good to remove these off shoots from the main plant. Too many off shoots can cause the main plant to strain. Spider plants propagate very easily, with less care.


Off shoots

Read more...

Tuesday, May 5, 2009

Difference Between Annuals, Perennials and Biennials

When I just started gardening, I didn't care much about what I planted. A flower was a flower. You sow it, it will grow and bloom someday. But if you want to make your own garden design, knowing when a flower blooms or dies is important. The terms annual, perennial and biennial should be clear in your mind:

Annuals
Annuals are plants that grow from seeds, bloom and seed within a single growing season. The complete plant dies(leaves, stem and roots) after the growing season. A common example of an annual flower is marigold which blooms througout the growing season. In non-tropical climates, annuals should be planted in spring.

Perennials
Perennials are plants that come back for many growing seasons. Part of the plant dies back in winter and grow again from the same roots the following growing season. They may not bloom the first growing season and they bloom for only a couple of weeks each season. These plants need periodic replacement(each 3 -5 years).

Biennials
Biennials are plants that needs two years to grow before dying. They grow vegetatively the first year, go through winter and blooms the following year. These plants die after blooming and seeding.

Read more...

Friday, April 24, 2009

Gardening To Relieve Stress

Don't be like him
Who isn't stressed? Our busy and competitive lifestyle often put a big deal of stress on us. Some people take a cigarette or a drink to try to relieve stress but they are doing themselves more harm. After one tedious day sitting at your office desk, the best way to get unstressed is by doing some physical exercises. Walk, jog, run, swim, cycle or go to the gym. Did you ever wonder if you could save time by exercising and making something rewarding at the same time?

You've guessed right. Gardening is the solution. As I always say, the fruits of gardening are not only what you get in your plate. If you see your garden as a chore, you won't get the stress out. However if you enjoy gardening, the personal satisfaction you get is one step in getting stress out of your life. Dig, chop, weed, sow.... The list is long. Doing these tasks will do only good to you and your body.

Gardening makes you bend and lift things many times. Be sure to do it right. I usually squat while weeding or planting. If you don't squat, you might put strain to your lower back. If you can't squat, place one knee on the ground(have a pair of knee-pads) and switch knee regularly.

Be cautious when lifting heavy objects. Always sit down, grab the object and use your legs to lift up. Do not bend nor twist your body. If something is too heavy for you, seek help. This advice is not only for elder gardeners!

If your doctor doesn't want you to do these activities, have a walk in your garden. Look at the plants, their colors, their smell... Pick up some flowers to put on your table.

Gardening is an excellent way to relieve stress for all ages but remember to do it safely.

More Gardening Tips

Read more...

Wednesday, March 18, 2009

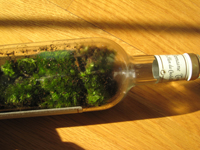
Make A Terrarium Out Of A Bottle Of Wine

This is awesome. I've never been bothered by ships in bottles but this one really got me excited:
A low tech and low maintenance terrarium that you can place anywhere you want.
You'll need some dexterity, patience and imagination but you'll appreciate the results.

Inspired by Paula Hayes, creator of amazing terrarium designs, Dr Vino suggests using clear wine bottles for this project. He also stated:
I first added dirt to the bottle. Then I ripped off chunks of moss, compressed them and shoved them through the wine bottle’s neck with a chop stick leftover from a previous takeout. A few pokes and prods later, I had them all lined up
If well cared for, the moss will grow in a rich carpet that you can proudly show off on your desk. Be sure not to let the bottle roll though..

Moss-age In A Bottle [via SlashFood]

Read more...

  © Blogger templates The Professional Template by Ourblogtemplates.com 2008

Back to TOP  

^ Scroll to Top